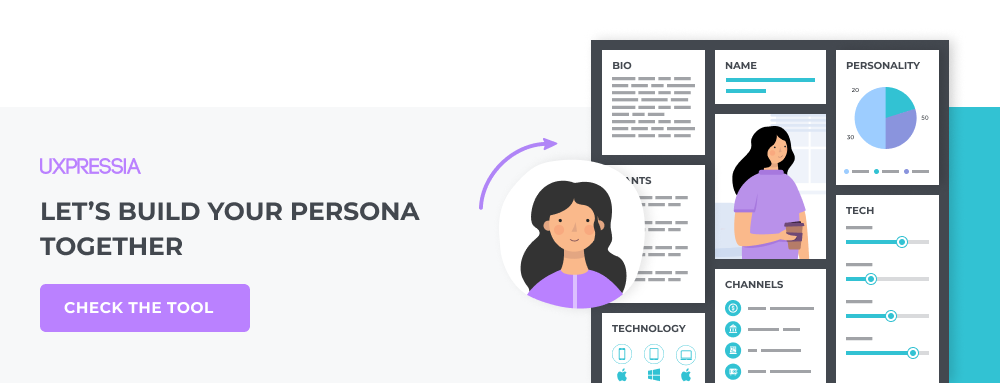
In this article, we'll go through the entire process of creating a Persona. Step by step, we’ll be adding new sections until we reach our final destination—one or a few production-ready, insightful Personas. What about a free customer persona template? Well, there are plenty of them. Let's start!
We’ll be using UXPressia’s Personas online tool for creating a Persona based on customers or users (and you can follow the same simple steps for employee Personas or buyer Personas). If you’ve never done it before, this is a great opportunity for you to learn something new in an easy and fun way. Go ahead, get a free account, and build Personas of your own while reading this guide!
Contents
- 1 Step One: Do research
- 2 Step Two: Segment your audience
- 3 Step Three: Decide on the layout
- 4 Step Four: Set demographic info
- 5 Step Five: Describe the Persona’s background
- 6 Step Six: Define Persona’s goals
- 7 Step Seven: Define motivations and frustrations
- 8 Step Eight: Add other ingredients
- 9 Step Nine: Use UXPressia AI persona generator
- 10 Step Ten: Create your own Persona
- 11 Persona creation checklist
Step One: Do research

The first thing you should take care of when developing Personas is gathering information about your customers. It's fine to start with hypotheses if you validate them afterward. But in general, without customer/user research, goals, tasks, needs, and pains of your Persona profiles will be about your imaginary customers or users, not real ones.
For example, you might assume that your customers’ main pain point is a lengthy checkout process, so you focus on speeding it up. However, research could reveal that their actual frustration is with unclear return policies, which lead to hesitations about making a purchase in the first place. Without real insights, you risk solving the wrong problems.
Building a customer Persona by populating it with unreliable data won’t do you any good as you won’t be able to come up with improvement ideas for people who really use your product or service.
So, where to look for data about your target audience? There are many sources of data and here are a few to get you started:
- Conducting interviews with customers or users
When it comes to effective communication, there's no denying that nothing beats the experience of a genuine conversation with real people — your actual customers. While technological advancements have introduced various means of gathering information, such as user screen recordings, online surveys, and other methods, interviews are here to stay. The number of interviews you'll need to do can vary greatly depending on the specific circumstances and objectives.
💡 Expert tip: Interview 5-30 people per role. Each of the roles will be defined by the tasks these individuals perform. You’ll start detecting trends once at least five people answer your questions. And, at some point, you’ll notice that you get very little or no new insights at the interviews. That means that you don’t need any more questions and interviews to identify and create a customer Persona.
- Talking to customer-facing people
If, for some reason, you cannot interview customers or users, interview people who directly communicate with them instead. These might be customer-facing employees: sales representatives, customer support agents, customer success managers, etc.
💡 Expert tip: Running an empathy mapping workshop with your team will help you reveal existing knowledge and get everyone on the same page.
- Using whatever info you already got at hand
You might have some ideas about your customers or users. Whether you’ve done some research in the past, analyzed sales data, observed user behavior, or just know certain things for sure from your own experience, these can all be valuable starting points. For instance, you might know from past surveys that customers prefer quick responses from support, or you’ve noticed from website analytics that users often drop off at a specific point in the checkout process. This existing information can help guide your initial assumptions before diving deeper into more detailed research.
- Making assumptions
If you’ve been working on a product for a while. You may have enough knowledge to make quite accurate assumptions about your customers or users. Just make sure to back them up with research afterward.
- Leveraging web analytics
Web analytics tools are a goldmine of quantitative data. So take the best of them 😉 Note that they can provide you with information about how your customers or users act, but not about their reasoning behind these actions. You’ll still need to talk to them to find out their customer/user motivation.
- Taking advantage of other data sources
These can be surveys, usability testing sessions, and other sources of data for your CJM to gather the necessary information.
Step Two: Segment your audience
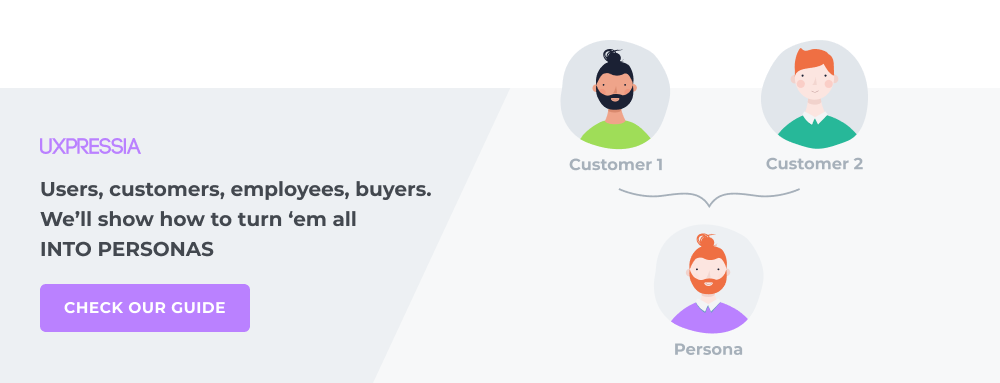
It is essential to keep in mind that you cannot use one Persona to represent your entire clientele. Nor can you base a Persona just on one specific customer you happened to know. It has to be a significant group of customers with similar characteristics, needs, goals, and behaviors.
You can use different criteria for grouping your users or customers into Personas, but remember that the two most common ones are demographics and behavior. Demographics-based Personas work best for such cases when a business wants to use them for targeted advertising on social media, while behavior-based Personas offer you much more. They give you valuable insights into how to improve the customer experience and your product or service in general.
When it comes to segmenting your audience into Personas, the first thing you need to do is analyze the research data you have collected. Then identify behavioral attributes common to people with the same role (e.g., project managers).
The attributes should describe what affects a person’s behavior in situations when the person:
- is trying to complete some tasks;
- is achieving their goals;
- is solving their problems;
- is interacting with your product or service.
Once again, a Persona is a collective image, a character that represents a segment of your target audience (TA). It cannot be the face of the entire TA. Nor can it be just one person. You need somewhat of a golden middle.
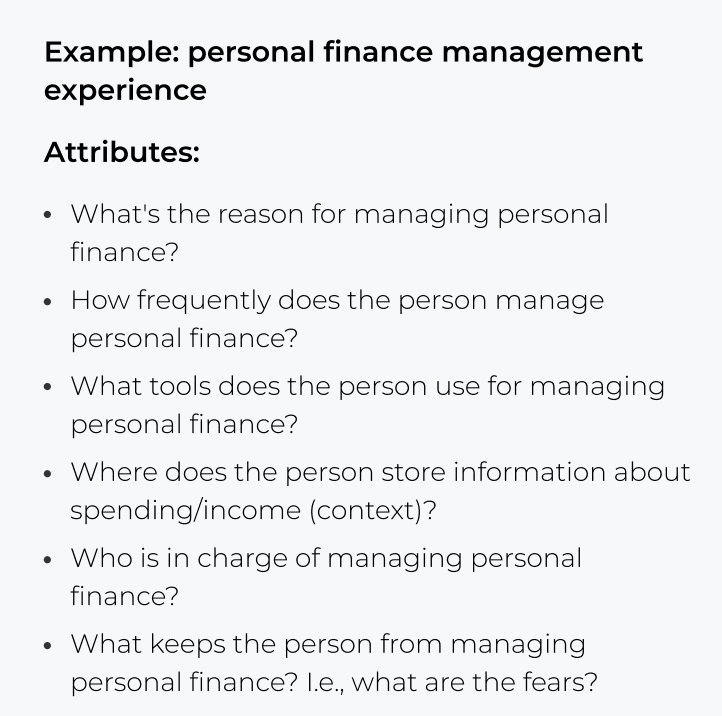
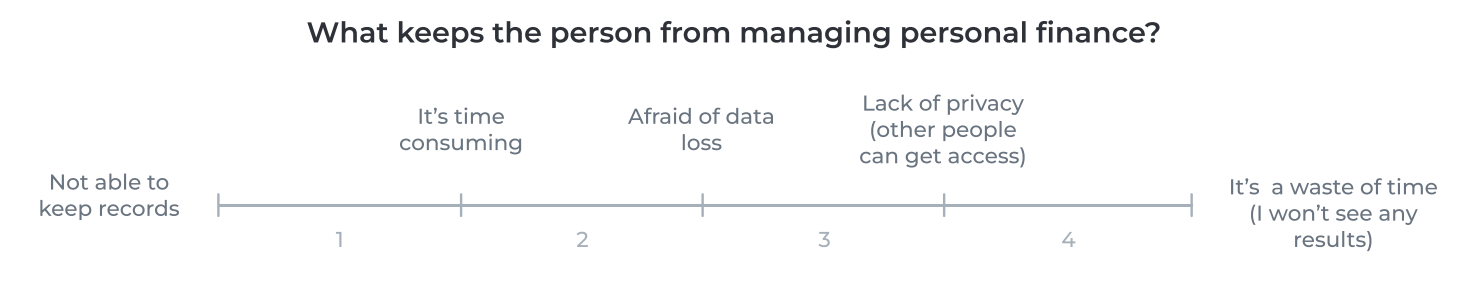
When you are done with behavioral attributes, define all possible values for each of them and put these values on scales. Just like this:
💡 Expert tip: It could be a scale from 5 to 20, but having about 8-12 scales is typically enough.
Once the scales are ready, put all research participants on each scale to compare them, their behavior and identify patterns.

Looking at the scales, you’ll notice that some people appear on the same or similar places on 5-9 scales. These people constitute a pattern, laying a foundation for your future Personas.
💡 Expert tip: Make sure that every pattern you identify is logical and explainable.
Having categorized your customers into groups, go ahead with developing your Personas.
How many Personas do you need for your project? Read our blog post about choosing the optimal number of personas.
Step Three: Decide on the layout
Persona profiles can have different layouts as they depend on your Persona’s type and purpose. The structure of the Persona profile is flexible. For example, some of them may include demographic information, while others would focus on behavioral aspects of this audience segment. The structure of a Persona profile is flexible and is determined by your specific goals. Moreover, your goals mean too—if you're creating a persona for marketing purposes, it might include sections like "Key Triggers for Online Advertising" to help tailor your campaigns effectively. On the other hand, a user persona focused on product design might emphasize "User Goals and Pain Points," providing insights into how users interact with your product and what challenges they face. In other words, the flexibility allows you to customize the persona profile to suit the needs of your project, ensuring that it aligns with your objectives.
So choose the sections that fit your needs from our ready-to-use set of sections or use a pre-filled template from our rich library of ready-to-go Persona templates (one of them is below).
Adding new profile sections and customizing them to your needs is a breeze:
💡 Expert tips:
- Whenever you get stuck while creating a Persona, check out our hints inside the Personas tool...
… and inside our Persona cheat cards.
- Turn your first Persona into a template to keep to the same Persona structure from the very beginning every time you work on a new profile. This way, you will be able to ensure consistency across your projects. Work with your team to develop a Persona structure that everyone is happy with, and make a copy of the Persona to use as a template for all new Personas.
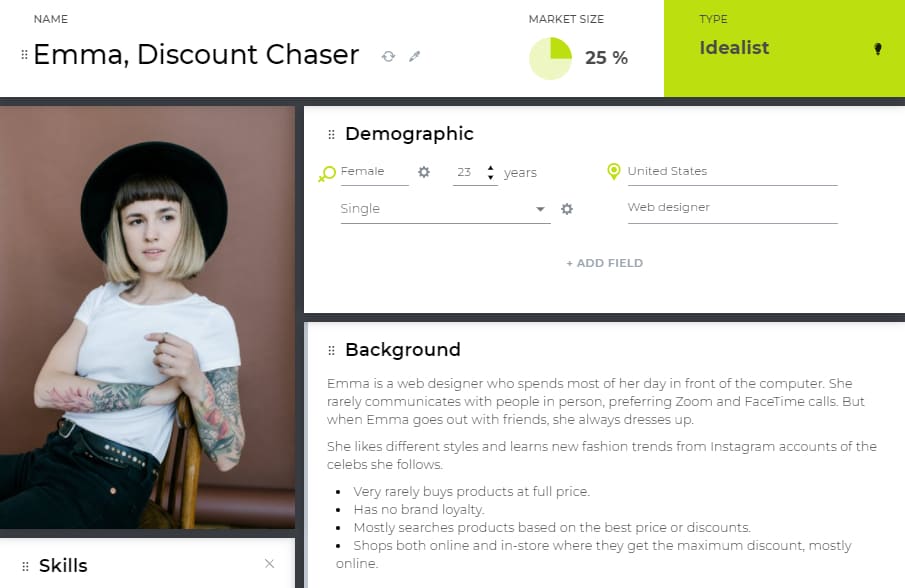
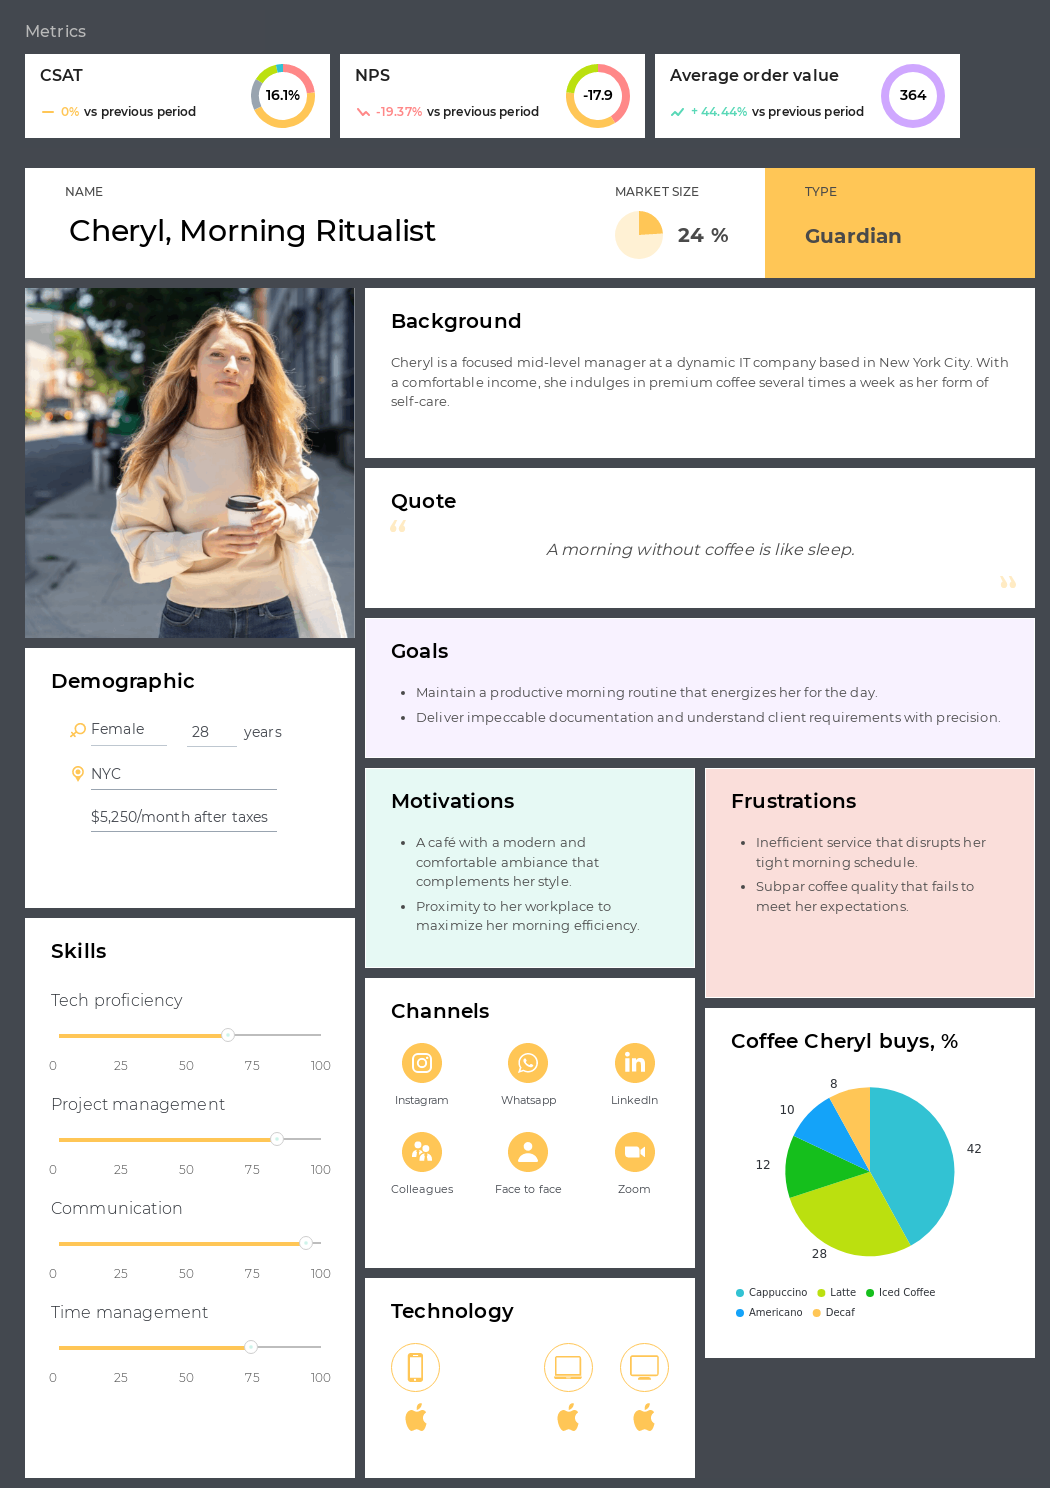
Step Four: Set demographic info
Having demographic information in Personas is critical in some cases. Lucky us, UXPressia lets you generate names and photos for Personas, so you don't have to rack your brain for a unique name or photo.
💡 Expert tips:
- Give your Personas meaningful names. In most cases, you can go either with a fictional First Name + Last Name ( e.g., John Patel) or with a short name for the group (e.g., Big Spender). The first option will help you develop empathy, while the other provides you an insight into personality traits.
- When picking a Persona's photos, avoid using staged shots or photos of famous people or team members. Real people known by your team may be associated with other personalities and only cause confusion.
Write down the most basic things like name, photo, age, marital status, job, income, residence, and so on. You can also introduce custom values using the editor:
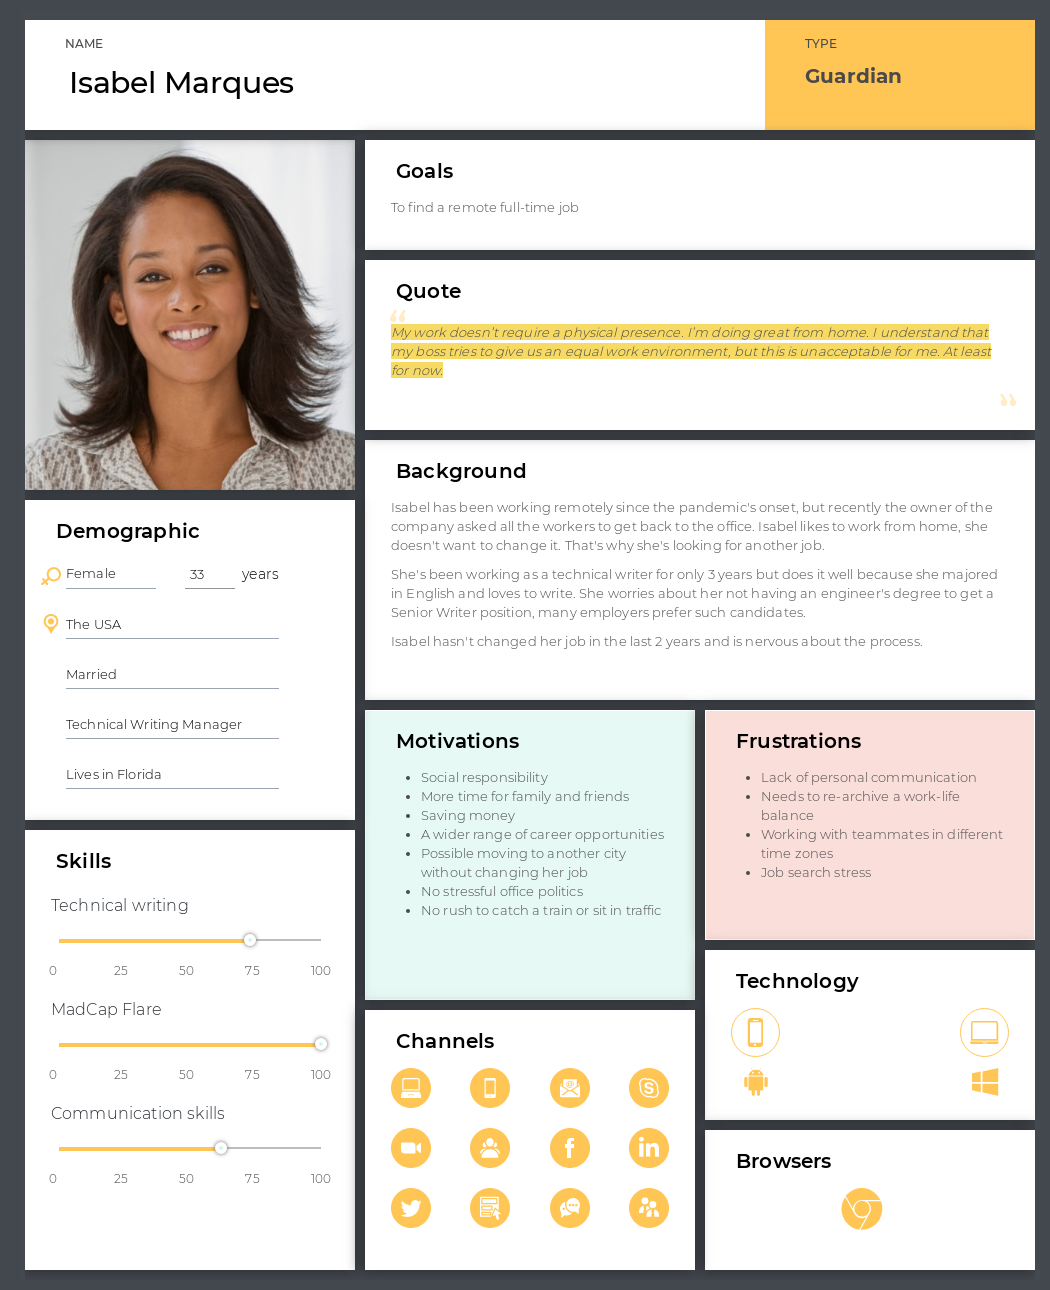
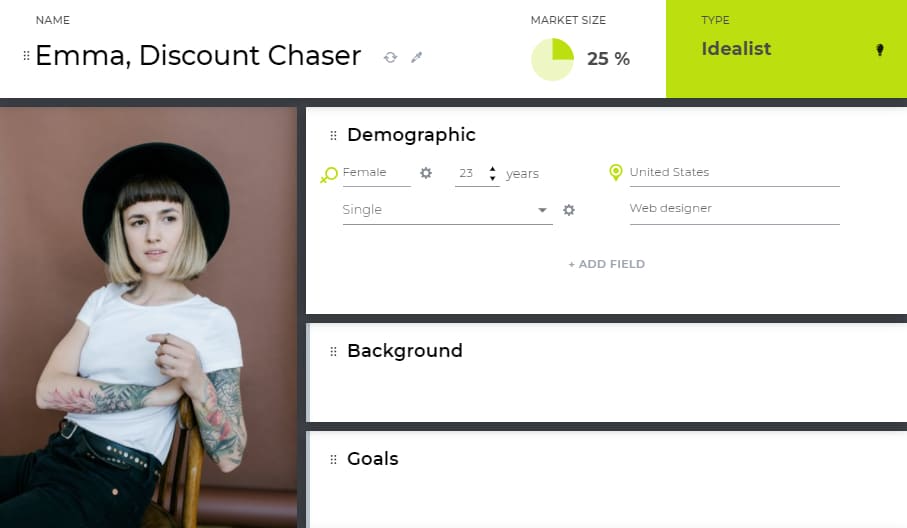
In Emma, you may have noticed a green stripe that says "Idealist". In UXPressia, we have this section to describe the type of personality and it's a great way to look at your Personas from a new angle..
Step Five: Describe the Persona’s background
Describing the background is our next stop. So, what to do?
Write down everything you know about your Persona’s background. Remember that any tiny detail may lead to valuable insight for your business. On the other hand, avoid unnecessary information that may cause cluttering and confusion. This section should serve two purposes: drive empathy and contain valuable and insight-rich information, and that’s it.
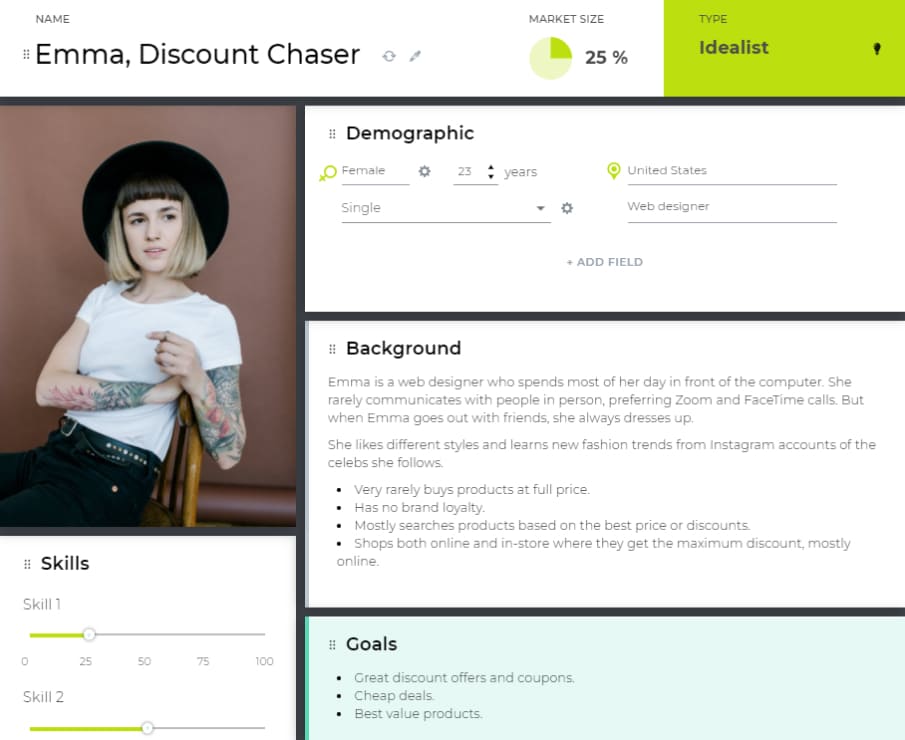
Step Six: Define Persona’s goals
Defining a Persona’s goals is extremely important because it allows you to see how your goals align with the goals of your customers or users. Not to mention that if you can meet customers’ needs better.
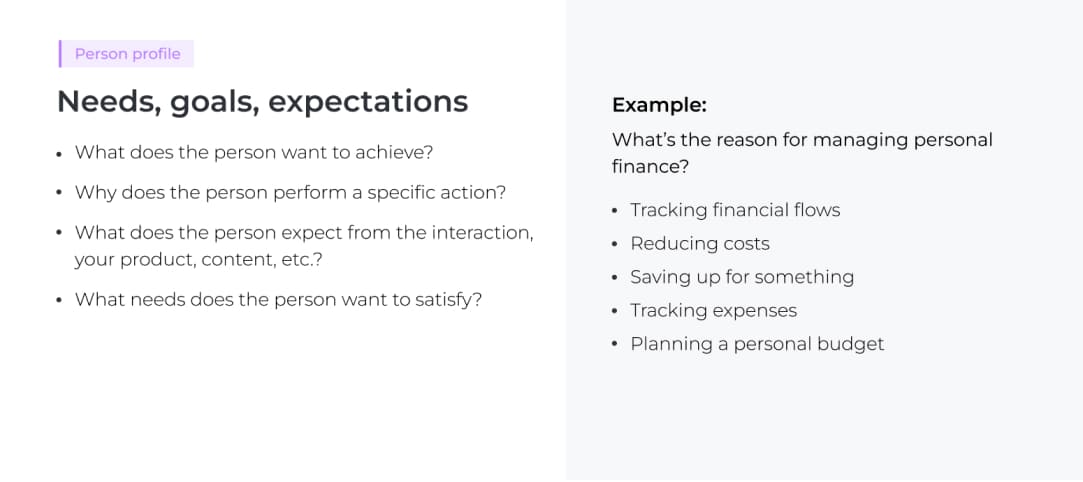
We’ll say that Emma is looking for great discount offers, cheap deals, and best-value products. While Cynthia wants to see only verified customer reviews and ratings and high-quality product images and videos on the website. And Thomas is interested in purchasing the latest and trending fashion products and services to make his own style stand out.
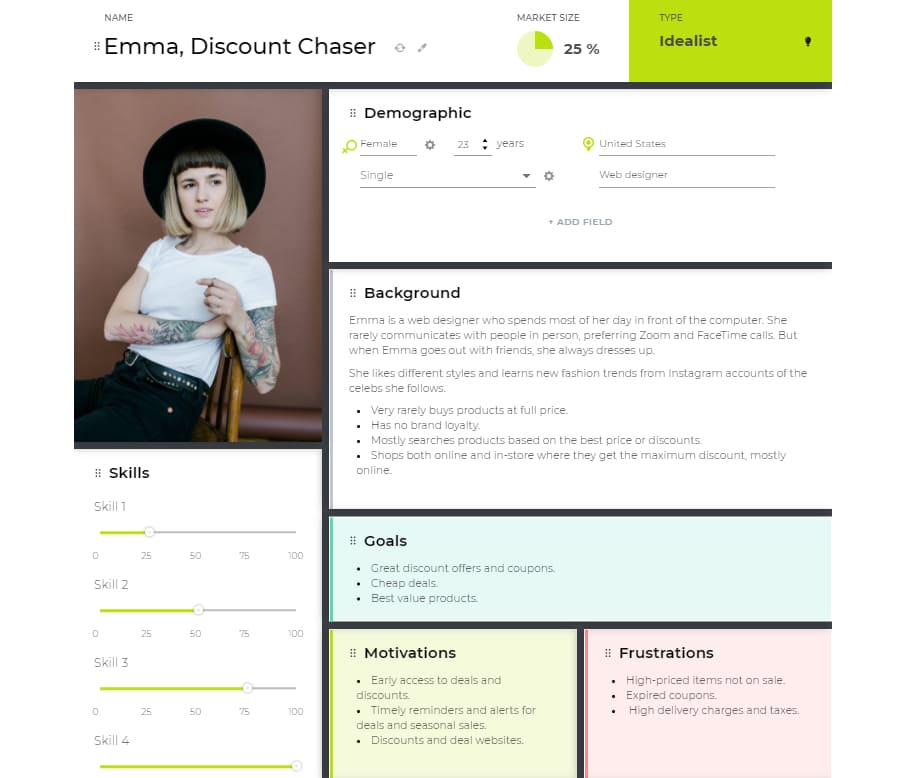
Step Seven: Define motivations and frustrations
Finding what motivates and frustrates your users or customers is something you must include in your Personas. Once done, it will illuminate what you can do to win their hearts and loyalty.
In Emma’s case, her pain points may be that she doesn’t want to deal with high delivery charges and taxes. She also wants to know when exactly the coupons she has are due to expire.
Speaking of her motivations, Emma would love to get early access to deals and discounts. Also, she wants to get reminders and alerts for deals and seasonal sales.
What about Cynthia and Thomas? Their motivations and frustrations are different from those of Emma. See the carousel below to compare them.
Step Eight: Add other ingredients
At this point, we are pretty much done with creating a Persona. But there's still a lot of room for improvement.
In UXPressia’s Personas tool, you can add loads of other sections to describe your real or ideal customer Persona in the most detailed way possible. So add skills, touchpoints, tech that your Persona uses, quotes, etc.
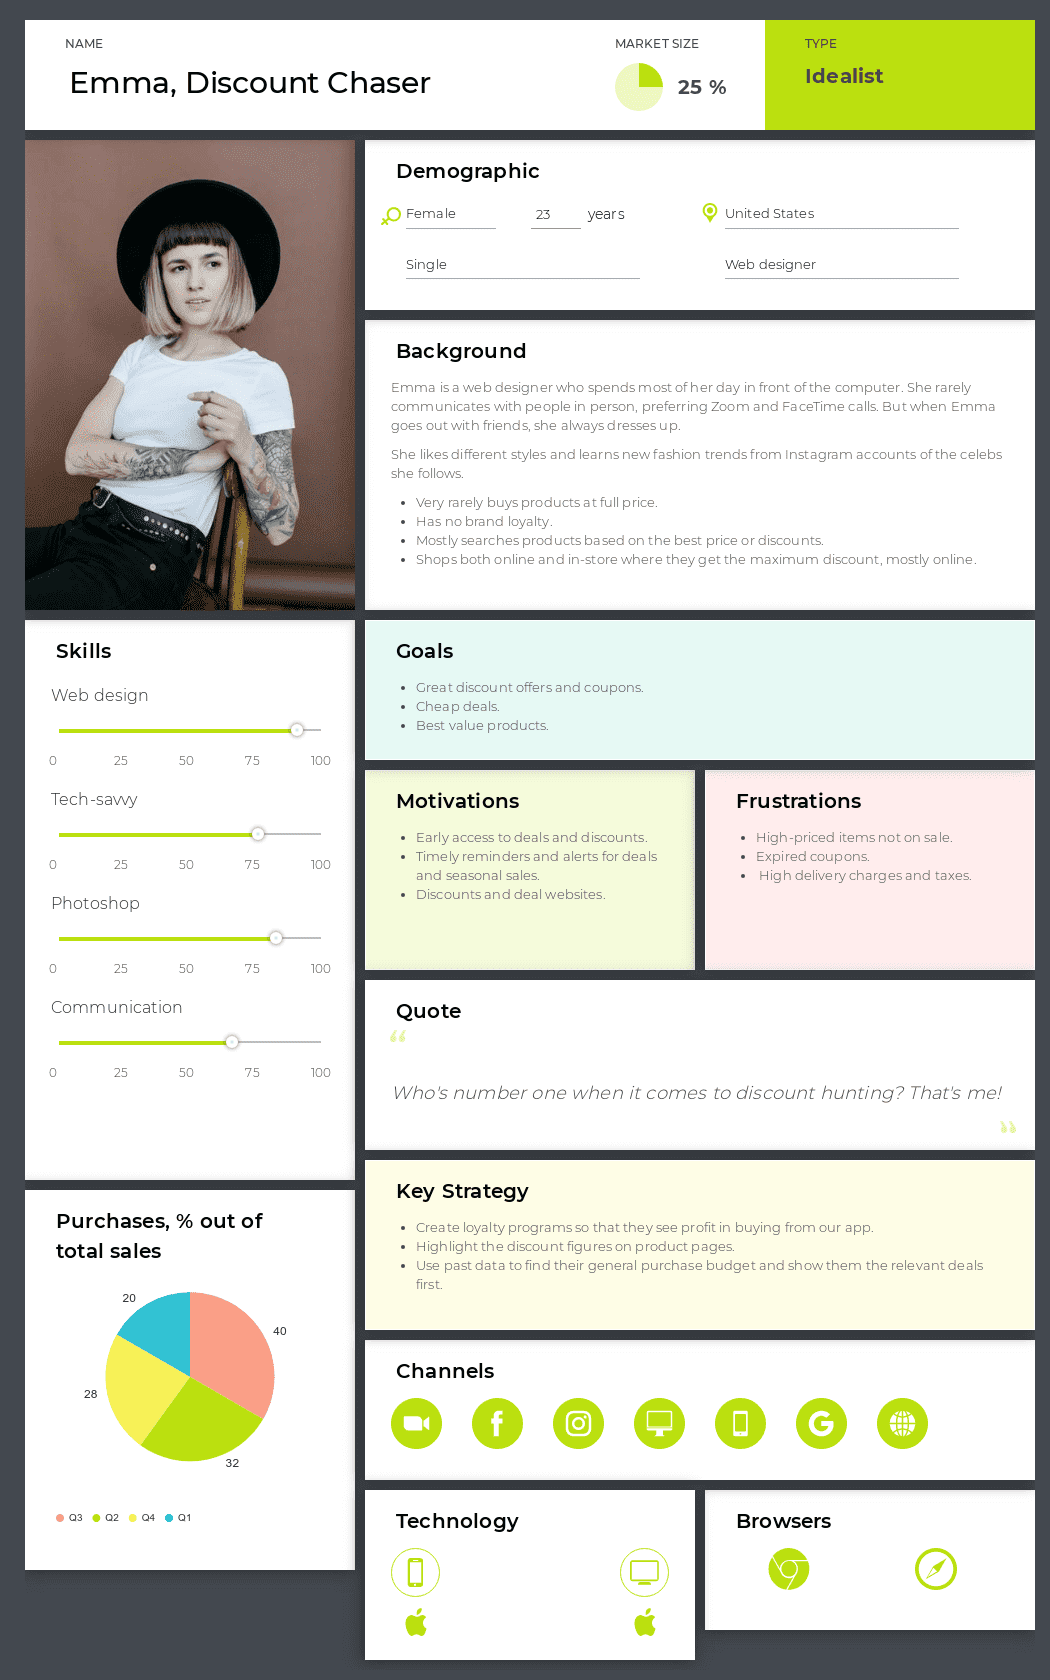
Pro tip: You can add a Metrics section to your Persona profile to connect your customer experience data with, say, business KPIs. That’s what you may got:
There's so much fun your team can have when creating a Persona. And the benefits are endless.
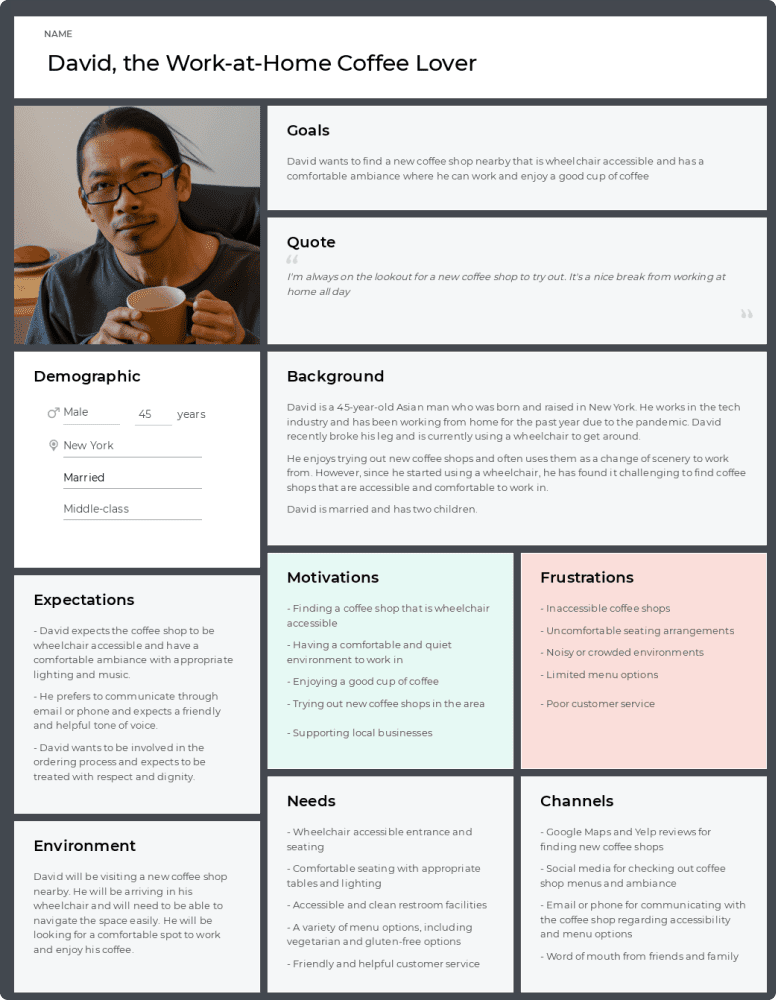
Step Nine: Use UXPressia AI persona generator
Actually, you can use the AI Persona Maker even at step number one, especially if you need to speed up the creation of personas or want to create a customer Persona by improving or augmenting what you already have.
For instance, AI can help you make your Personas region-specific, come up with feature or brand promotion ideas, suggest business ideas and marketing strategies, structure the information, draw conclusions based on existing insights, and so much more.
Below is an example of a persona generated by our AI:
Step Ten: Create your own Persona
Now you know the steps to create a Persona from scratch. By conducting thorough research and utilizing UXPressia's Persona tool, you can develop a Persona that aligns with your target audience's needs and helps you gain a deeper understanding of your customers. So, what are you waiting for? Bring your customer persona to life with us 😉
Also, be sure to download our Persona creation guide and access it whenever you get stuck. And share it with your fellow customer journey mappers to learn from it, too.
Persona creation checklist
- Conduct research
- Interview customers or users (5-30 people per role)
- Talk to customer-facing employees (sales, support, etc.)
- Utilize existing data (analytics, past research, etc.)
- Make educated assumptions, but validate them with research
- Segment your audience
- Identify significant groups with similar characteristics
- Use demographics and behavior to define Personas
- Analyze patterns and behaviors to create meaningful Personas
- Decide on the layout
- Choose sections based on the purpose (e.g., marketing, product design)
- Use a consistent structure across all Personas
- Set demographic info
- Include essential details (name, photo, age, job, etc.)
- Avoid using staged or well-known photos
- Describe the Persona’s background
- Include relevant details that drive empathy and provide insights
- Define Persona’s goals
- Align customer goals with your business objectives
- Define motivations and frustrations
- Identify what drives and frustrates your Persona
- Add other ingredients
- Include additional sections like skills, touchpoints, tech usage, quotes, etc.
- Use UXPressia AI Persona Generator
- Speed up the process or enhance existing Personas with AI-generated insights
- Create your own Persona
- Follow these steps to develop Personas that truly reflect your target audience
Use this checklist as a quick reference to ensure you're covering all essential aspects when creating a Persona 😉


All articles are nice and useful as well as your services, it seems your tools will be my favorite, can I ask what are the differences among motivations -in personas-, and impact and deliverables – in impact mapping-.
Thank you! Excited to hear that you like UXPressia 🙂
First, impact mapping and personas are two very different techniques so it isn’t really okay to compare them.
Still, the main difference between these two is
– Motivations in personas show what makes your persona content and happy
– Impacts in impact mapping show what you want your personas (or actors) to do in order to achieve your business goal
– Finally, deliverables show how you can make your personas act to make those impacts.
An example of persona motivations would be something like “easy product search” or “clear checkout process” if we take an online store. These are the things that make your persona’s life easier and that’s what your persona looks for in products like ours.
Now, in impact mapping, we can take the same online store. Let’s say we sell donuts online. Our business goal is to sell more donuts obviously. Our persona is someone who loves donuts but he/she isn’t particularly happy about spending a lot of money on this treat. The impact here would be for this persona to buy more donuts. But what is the deliverable we could come up with to make the persona buy more without worrying about money? Offer a loyalty program like “buy 5 donuts and get 6th for free”. In this case, this would be a deliverable.
Does this make sense? 🙂
That’s Amazing. Thanks a lot for replying and sharing knowledge.
Hello. yes, this does make a lot of sense.
How then does opportunities/recommendations differ from deliverables in impact mapping?
Thank you for the question, Chi. As Arthur already mentioned, impact mapping and personas are two different techniques.
When it comes to opportunities/recommendations, you can certainly have a dedicated section in your persona’s profile if you want. E.g., to list product ideas linked to a specific persona based on their motivations, frustrations, etc. But you are much more likely to find opportunities/recommendations in a dedicated customer journey map section because they are usually based on the experience flaws you discover at different stages of your persona’s journey and other insights you got when visualizing the journey.
As for deliverables in impact maps, they are first and foremost linked to specific business goals, not customer journey stages and your persona’s experience at each of them. They show how you can make your persona(s) do something you want them to do to help you achieve your business goal. Opportunities/recommendations in a journey map focus on how to make a persona’s experience better at certain stages of their customer journey and turn this journey (entire or a part of it, depending on your map scope) into a smoother one.
This is good post. Especially for maybe a small business that doesn’t quite understand how to create a persona.
Thank you, Kak! We also have these downloadable brainstorm cards for persona creation that you might like too: https://uxpressia.com/blog/customer-persona-cheat-cards.
Arthur, can you please explain section II in more details, especially how you arrive at a scale 5-9, when the scales in the examples used are 1-5. I would appreciate further clarification on segmenting the personas. And in the examples provided, I do not see any pattern evolving. Please advise. Thank you
Thanks for an interesting question, Vyas.
5-9 refers to the total number of behavioral attribute scales you should have to identify patterns. As for the values of an individual scale, we recommend having at least three values on it. In the example we used here, each scale has a value from 1 to 5. E.g., see the “What keeps the person from managing personal finance?” scale in Step 2. We covered these things in more detail in our guide, which you can download above.
Great article!
Thank you, Mikita! Have you ever created a customer persona or are you going to build one for the first time? To get even more inspiration, you can check out our Template library (https://uxpressia.com/templates), there are lots of ready-to-go personas.
great